Introduction
If you’ve looked into service meshes for Kubernetes, you’ve likely run into Istio or Linkerd, and by extension, the sidecar proxy pattern they’re built on. Cilium offers a different take on the same problem: a service mesh with no sidecars at all, built on top of a Linux kernel technology called eBPF.
Cilium is a broad project, it’s also a CNI plugin, an API gateway, and an observability platform, and it’s worth knowing that going in. But this post is specifically about Cilium as a service mesh.
Part 1: Why a Sidecar-Free Service Mesh
Traditional service meshes like Istio or Linkerd inject a sidecar proxy into every pod. That proxy intercepts all inbound and outbound traffic and enforces mesh features like mTLS, retries, and traffic policy at the application layer.
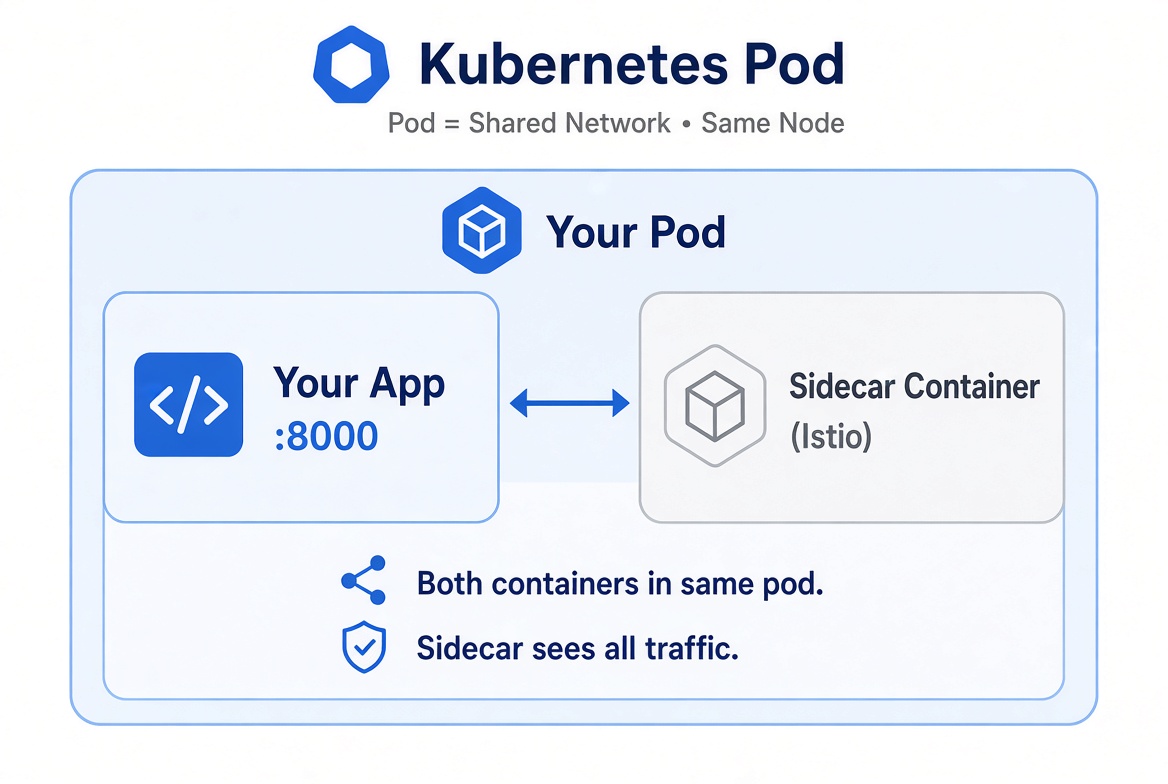
That model works, but it comes with real costs: an extra container per pod, extra memory, and extra latency on every hop through the proxy. At small scale it’s manageable. At hundreds or thousands of pods, it becomes a meaningful chunk of cluster resources and another moving part to operate.
Cilium takes a different approach. Instead of a proxy per pod, it uses eBPF to run programs directly in the Linux kernel, so the kernel itself understands service identities and can enforce policy, load balance connections, and set up mTLS without a sidecar in the way. For the L7 features that do need a proxy (like HTTP-aware routing), Cilium uses a shared Envoy instance per node rather than one per pod, so you still get L7 capability without the per-pod overhead.
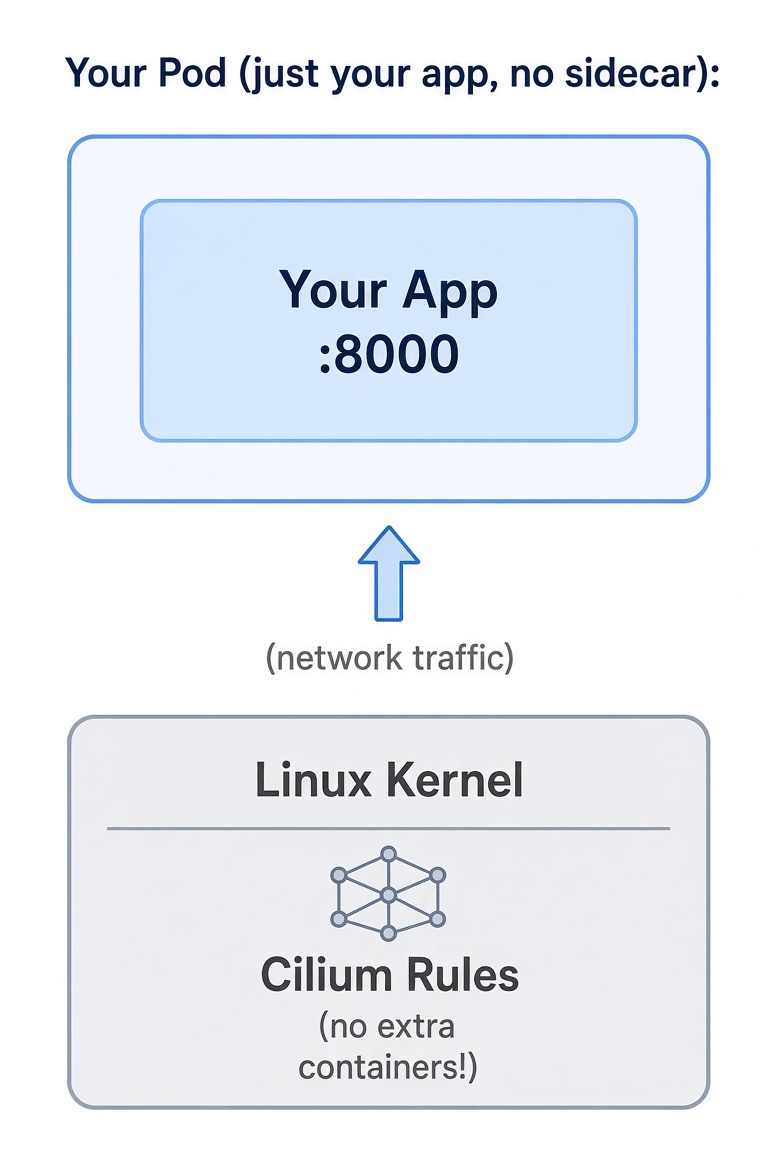
In mesh terms, this gets you the same core capabilities you’d expect from Istio or Linkerd:
- Traffic control between services (who can talk to whom, at L3/L4 and L7)
- mTLS between services, without changing application code
- Observability into every connection on the mesh, via Hubble
The rest of this post walks through setting that up.
Part 2: Prerequisites
Cilium’s eBPF programs run in the Linux kernel of your Kubernetes nodes, you’ll need kernel version 5.4+ for full features
You’ll also need:
- A running Kubernetes cluster (a local one like kind, minikube, or Docker Desktop’s Kubernetes is fine for following along)
kubectlconfigured to talk to that cluster- The Cilium CLI, which we’ll use for installing Cilium and checking traffic throughout this post
Install the Cilium CLI by following the official installation guide, which has instructions for macOS, Linux, and Windows.
On macOS with Homebrew
brew install cilium-cli
Verify it’s on your PATH:
cilium version --client
If you’re using kind: by default,
kind create clusterinstalls its own CNI (kindnet) to handle pod networking. If you install Cilium on top of that without disabling it, Cilium’s agent comes up fine, but kindnet is still the one actually moving your traffic, so you won’t see anything in Cilium’s datapath. Disable it before creating the cluster:
# kind-config.yaml
kind: Cluster
apiVersion: kind.x-k8s.io/v1alpha4
networking:
  disableDefaultCNI: true
  kubeProxyMode: "none"   # optional, lets Cilium fully replace kube-proxy
nodes:
- role: control-plane
kind create cluster --config kind-config.yaml
If you’re on an already-running managed cluster (EKS, AKS, GKE): the cluster comes with its own default CNI, and Cilium won’t actually see traffic unless that CNI is out of the way.
- EKS ships the AWS VPC CNI (
aws-node) by default, replacing it on a cluster with live traffic needs a proper migration plan, not just an install command. See Cilium’s migration guide.- AKS supports BYOCNI (bring your own CNI) mode, but only if you create the cluster with
--network-plugin nonefrom the start. If your cluster already exists with Azure CNI installed, switching means a rebuild, or using Azure’s own “Azure CNI powered by Cilium” data plane option instead of installing Cilium yourself.- GKE expects Cilium to be the primary CNI from cluster creation
Part 3: Installing Cilium with Mesh Features
cilium install \
  --set hubble.relay.enabled=true \
  --set hubble.ui.enabled=true \
  --set authentication.enabled=true \
  --set authentication.mutual.spire.enabled=true \
  --set authentication.mutual.spire.install.enabled=true
Once it’s done, check the install status:
cilium status --wait
    /¯¯\
 /¯¯\__/¯¯\    Cilium:             OK
 \__/¯¯\__/    Operator:           OK
 /¯¯\__/¯¯\    Envoy DaemonSet:    OK
 \__/¯¯\__/    Hubble Relay:       OK
    \__/       ClusterMesh:        disabled
You can also confirm the underlying pods directly:
kubectl get pods -n kube-system -l k8s-app=cilium
Part 4: Verifying and Observing Traffic with Hubble
Installing Cilium and seeing “Running” pods tells you the agent is up, but it doesn’t prove that traffic between your services is actually being handled by Cilium’s datapath.
A mesh is about service-to-service traffic, so let’s deploy two actual Kubernetes Services to test with.
# test-services.yaml
apiVersion: apps/v1
kind: Deployment
metadata:
  name: frontend
spec:
  replicas: 1
  selector:
    matchLabels:
      app: frontend
  template:
    metadata:
      labels:
        app: frontend
    spec:
      containers:
      - name: app
        image: nginx
        ports:
        - containerPort: 80
---
apiVersion: v1
kind: Service
metadata:
  name: frontend
spec:
  selector:
    app: frontend
  ports:
  - port: 80
---
apiVersion: apps/v1
kind: Deployment
metadata:
  name: backend
spec:
  replicas: 1
  selector:
    matchLabels:
      app: backend
  template:
    metadata:
      labels:
        app: backend
    spec:
      containers:
      - name: app
        image: nginx
        ports:
        - containerPort: 80
---
apiVersion: v1
kind: Service
metadata:
  name: backend
spec:
  selector:
    app: backend
  ports:
  - port: 80
kubectl apply -f test-services.yaml
kubectl get pods,svc
Now, generate traffic from the frontend service to the backend service.
kubectl exec deploy/frontend -- curl -s -o /dev/null -w "%{http_code}\n" http://backend
Use Hubble to observe this specific service-to-service flow. Hubble reads flow events from Cilium’s eBPF datapath.
Since we enabled Hubble at install time, check that its components are running. If you skipped Hubble during installation, enable the Relay and UI first:
kubectl get pods -n kube-system -l k8s-app=hubble-relay
kubectl get pods -n kube-system -l k8s-app=hubble-ui
cilium hubble enable --ui
The standalone hubble CLI is separate from cilium. Install it from the official releases page, or if you are on macos run:
brew install hubble
then
cilium hubble port-forward
Leave the port-forward running, open another terminal, and watch traffic from the frontend pod to the backend Service:
hubble observe \
  --from-pod default/frontend \
  --to-pod default/backend
You should see the DNS lookup followed by TCP flows from frontend to the backend pod, with a verdict such as FORWARDED:
default/frontend-... -> default/backend-...:80 to-endpoint FORWARDED (TCP)
This confirms that Cilium handled the traffic.
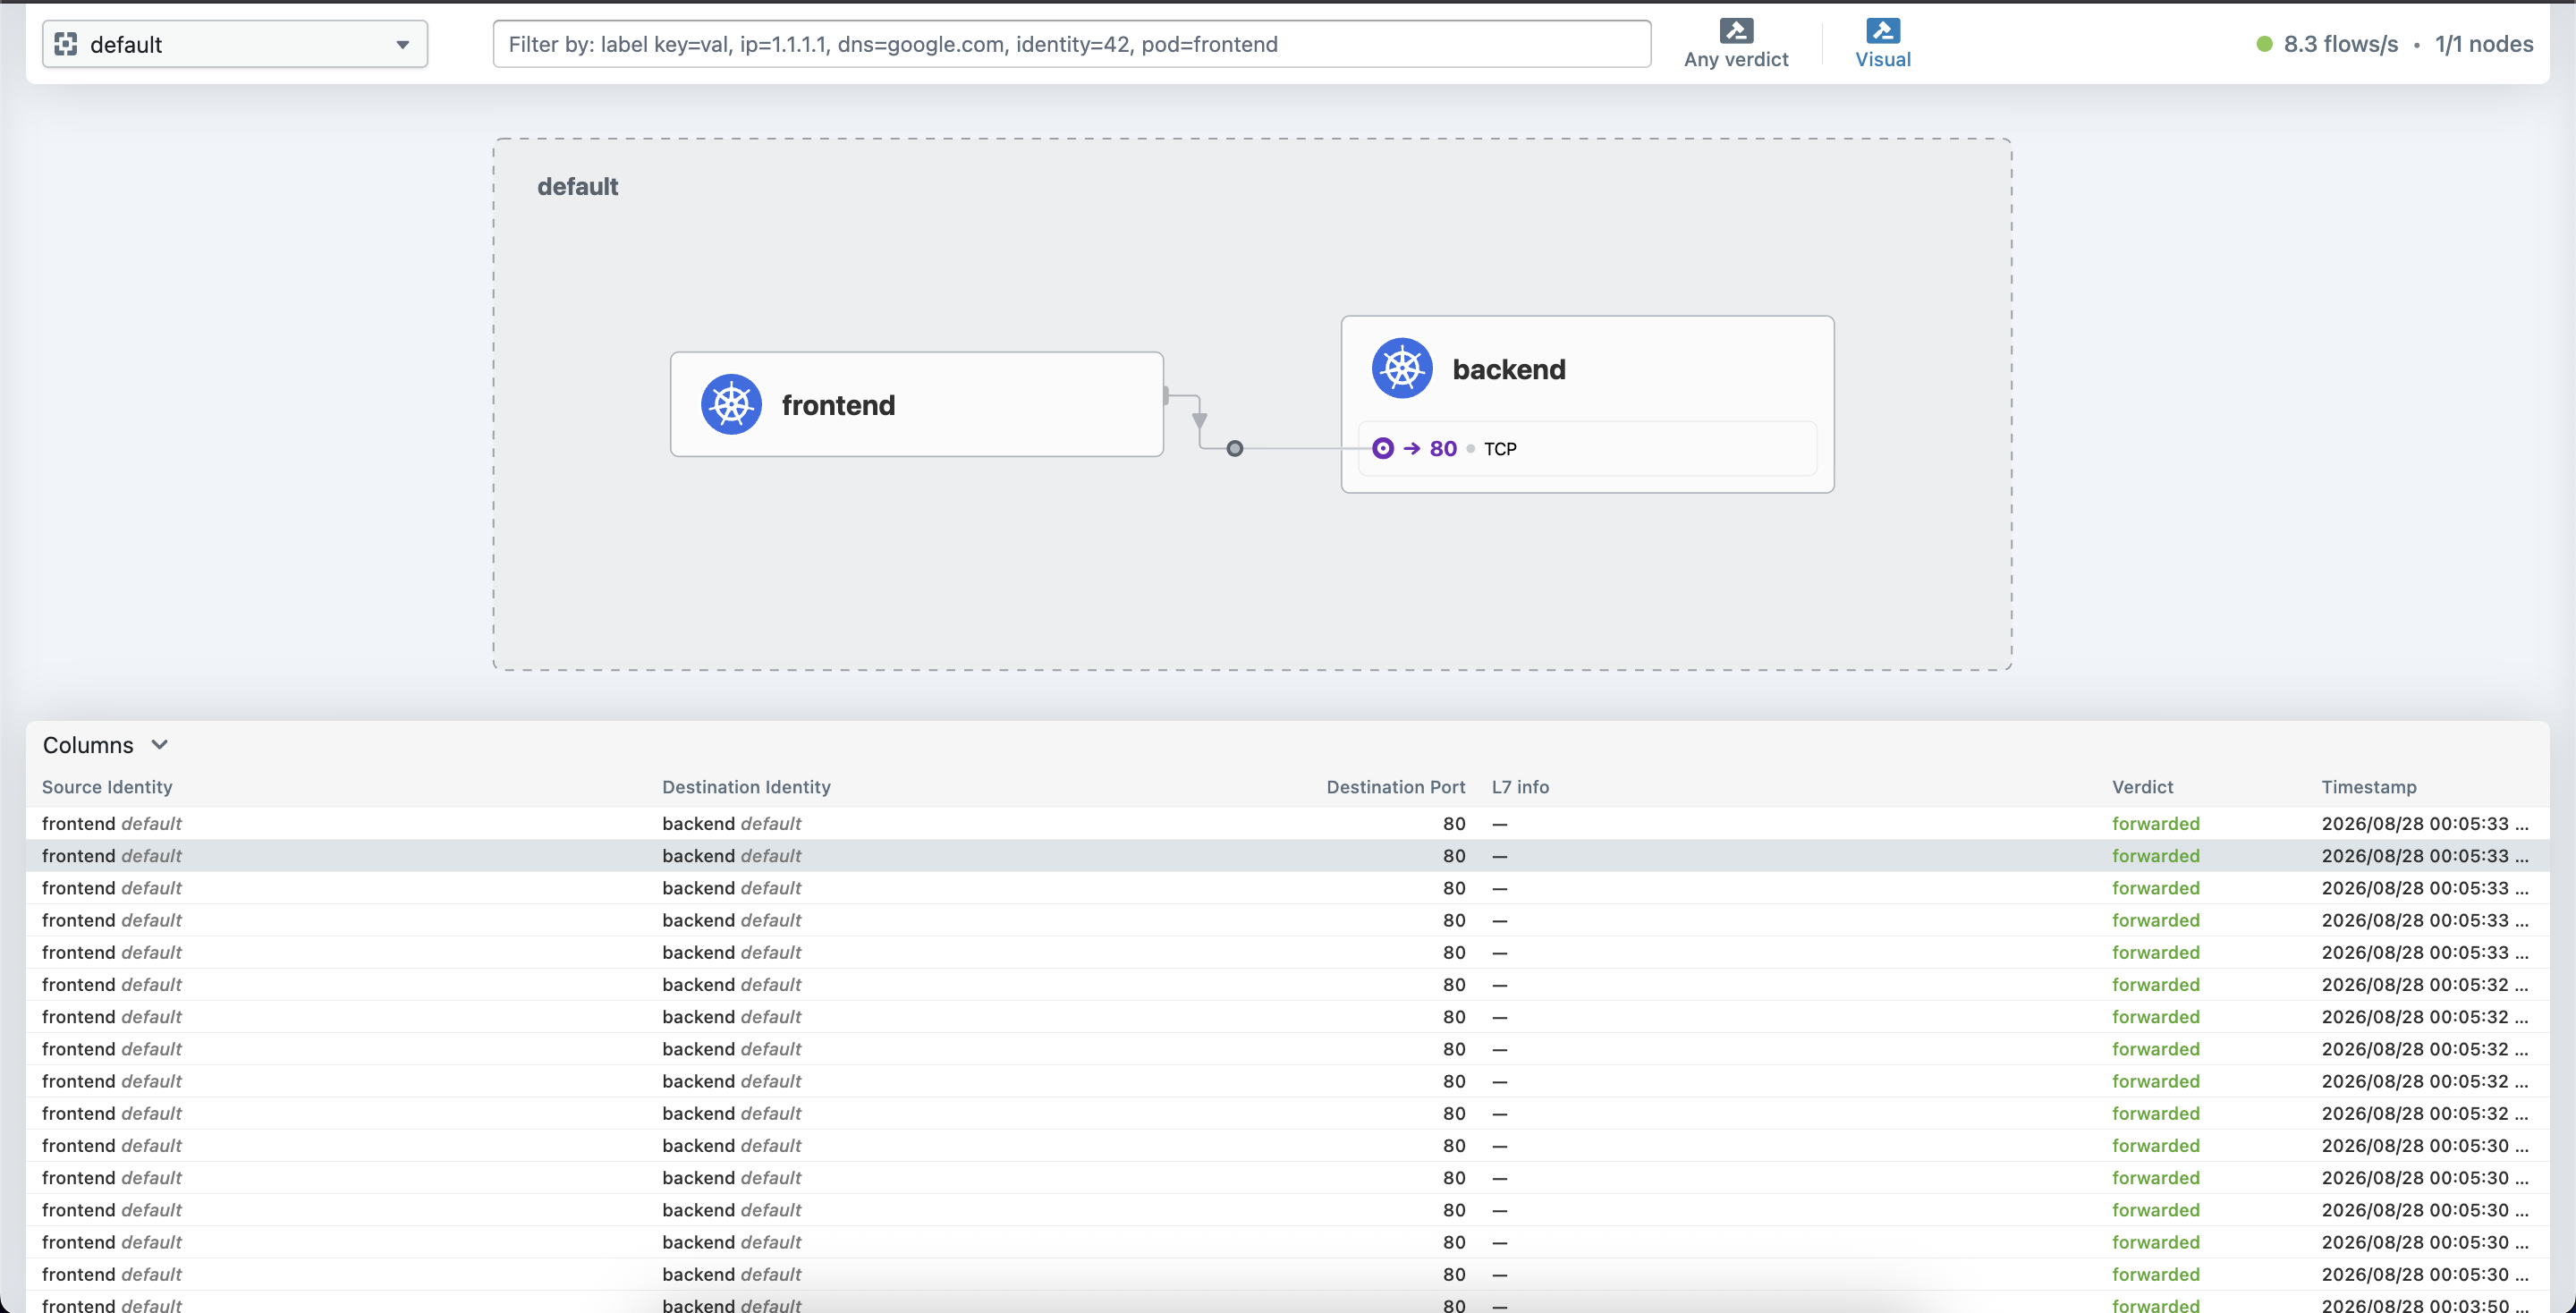
To start hubble ui
cilium hubble ui
It shows live connections between workloads and makes it easier to see allowed and dropped flows as you add network policies.
For a more thorough, one-shot check, the Cilium CLI also ships a built-in connectivity test that deploys its own client/echo services and verifies traffic flows correctly through the mesh, including through network policies:
cilium connectivity test
This is the most reliable way to sanity-check a fresh install end to end, but it can take some time
Part 5: Securing and Controlling Service-to-Service Traffic
A service mesh needs both authentication and authorization: services should verify who they are talking to, and network policies should define who is allowed to talk in the first place. Cilium provides both through mutual TLS (mTLS) and CiliumNetworkPolicy.
CiliumNetworkPolicy looks similar to Kubernetes’ native NetworkPolicy, but supports more, including L7 rules for HTTP, gRPC, and Kafka. A basic policy allowing only frontend to reach backend looks like this:
# network-policy.yaml
apiVersion: cilium.io/v2
kind: CiliumNetworkPolicy
metadata:
  name: allow-frontend-to-backend
spec:
  endpointSelector:
    matchLabels:
      app: backend
  ingress:
  - fromEndpoints:
    - matchLabels:
        app: frontend
kubectl apply -f network-policy.yaml
verify:
kubectl get ciliumnetworkpolicies
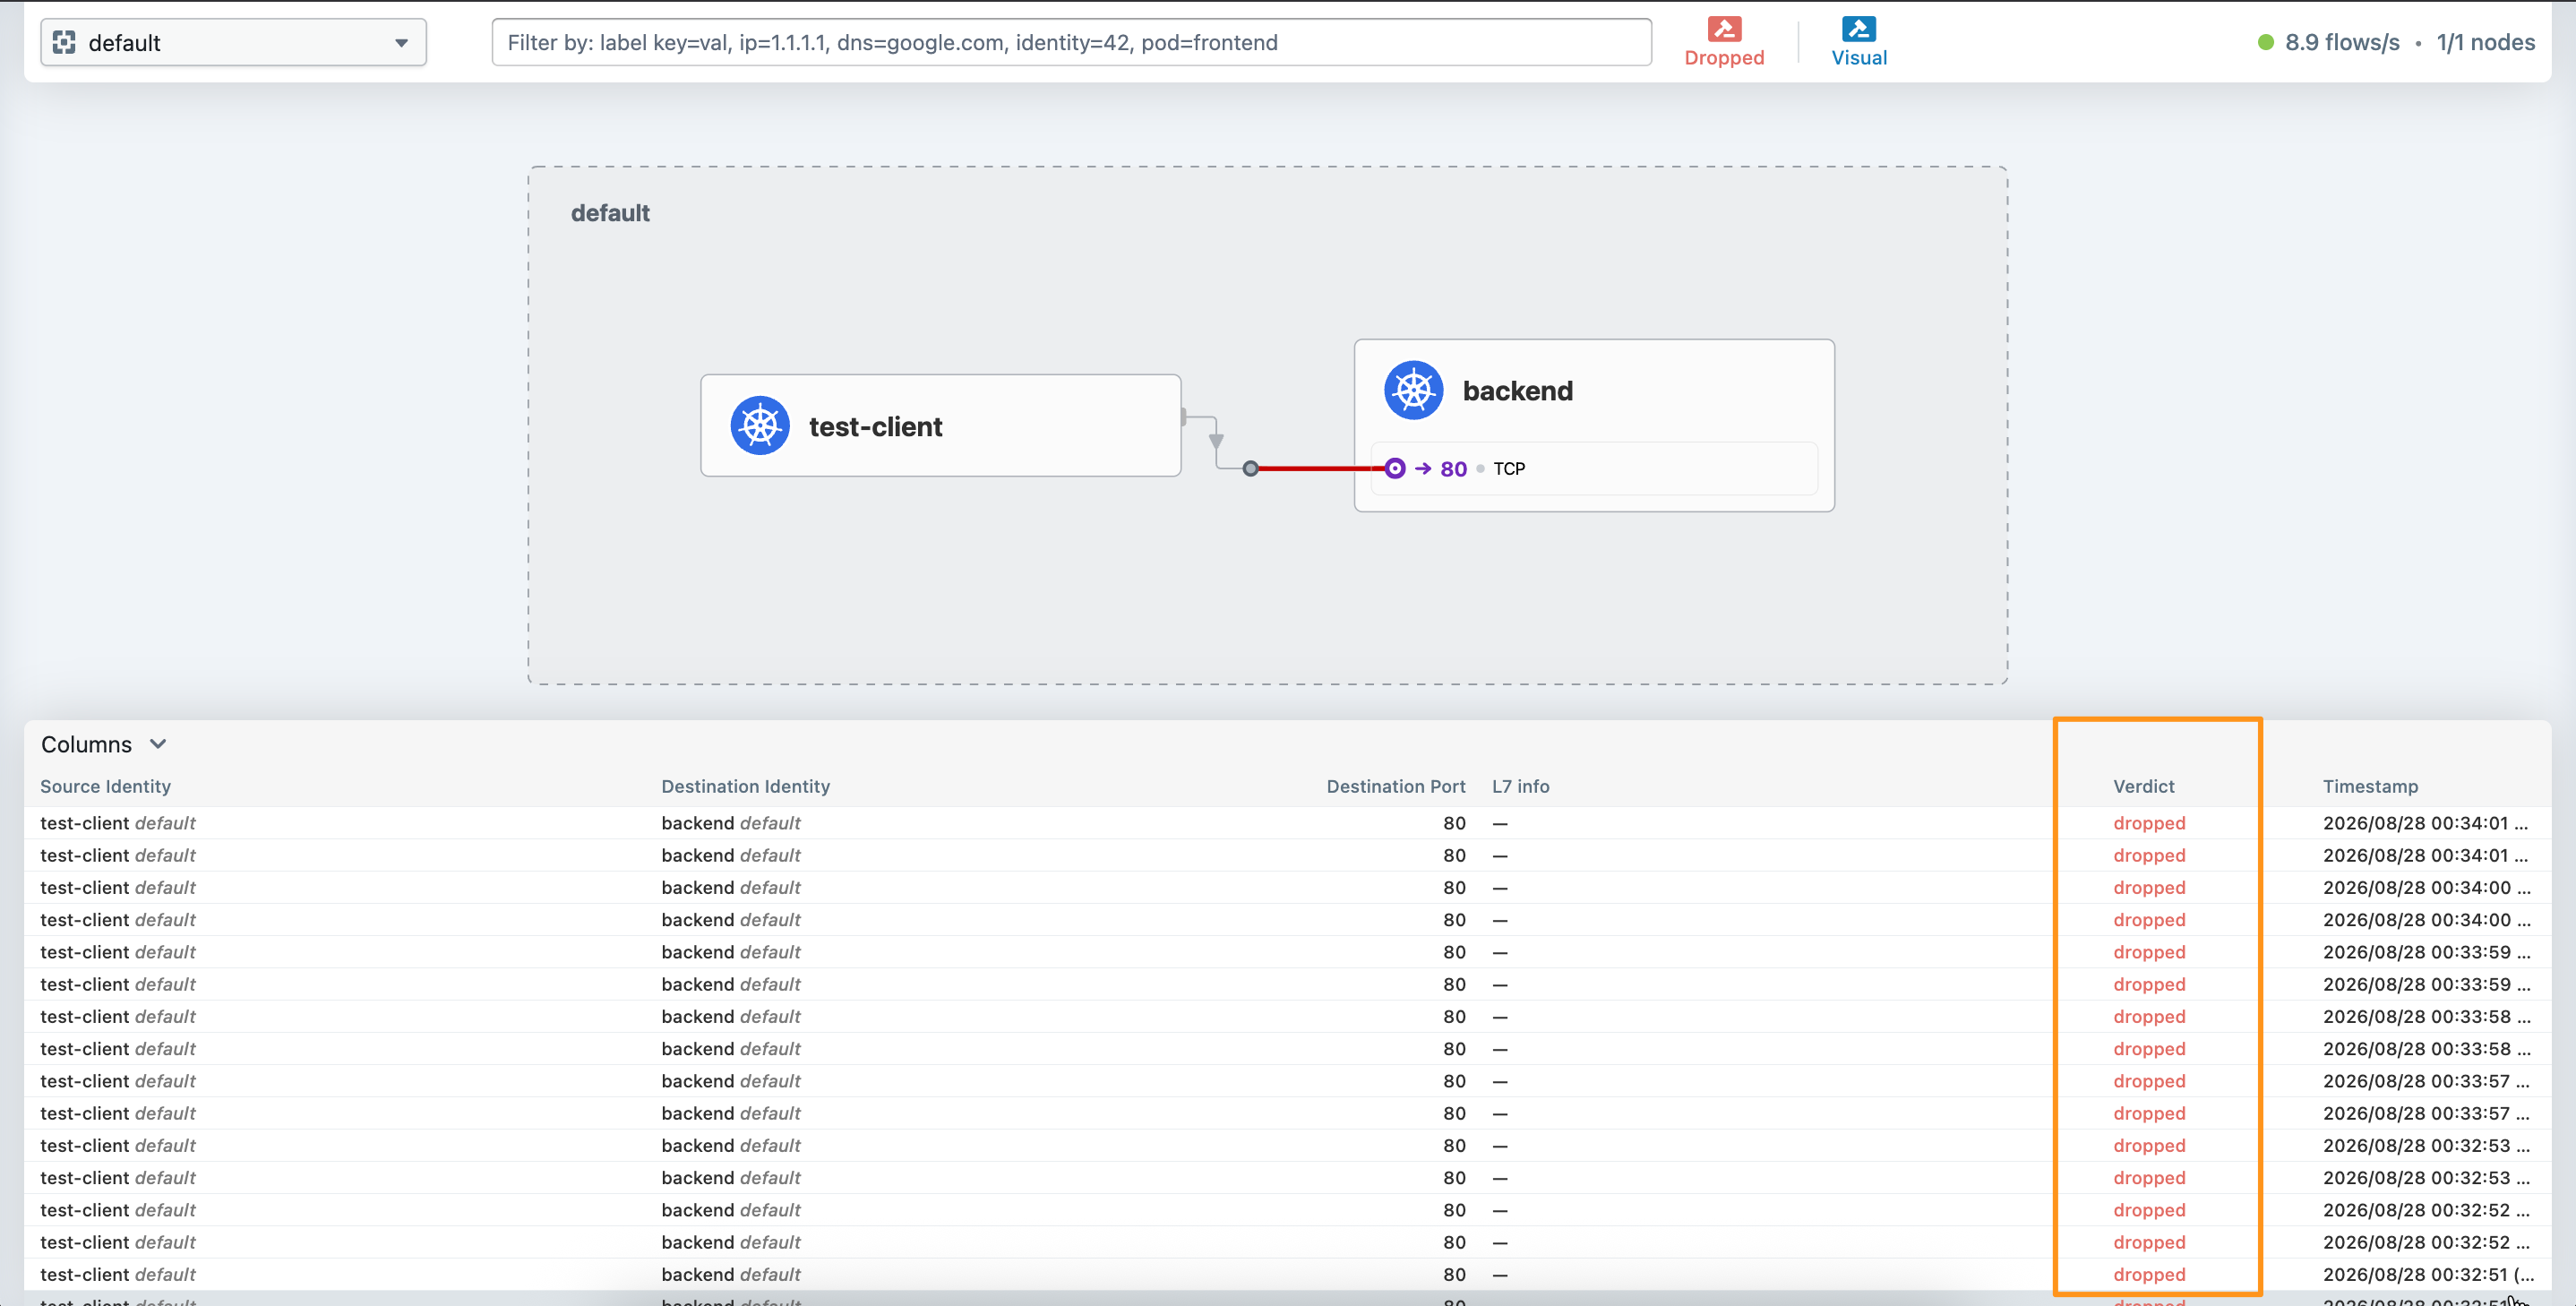
Once applied, frontend can still reach backend, but any other service trying to hit backend gets blocked. In Hubble, the allowed flow is marked FORWARDED and another service’s attempt is marked DROPPED.
To test a dropped traffic, run a temporary pod with a different identity:
kubectl run test-client \
  --rm -it --restart=Never \
  --image=curlimages/curl \
  --labels=app=test-client \
  -- \
  curl -v --max-time 5 http://backend.default.svc.cluster.local
In hubble UI, you should see the traffic to backend being dropped.
A core promise of a service mesh is that traffic between your services is encrypted and authenticated, without your application code knowing or caring. Cilium does this through mutual authentication, backed by SPIFFE/SPIRE for issuing identities, without a sidecar doing the TLS handshake on your behalf.
If you installed with the authentication.mutual.spire.* flags from Part 3, SPIRE is already running. Check it:
kubectl get pods -n cilium-spire
To require mutual auth between two services, add an authentication block to a CiliumNetworkPolicy:
apiVersion: cilium.io/v2
kind: CiliumNetworkPolicy
metadata:
  name: require-mtls-backend
spec:
  endpointSelector:
    matchLabels:
      app: backend
  ingress:
  - fromEndpoints:
    - matchLabels:
        app: frontend
    authentication:
      mode: "required"
kubectl apply -f network-policy.yaml
With this applied, frontend can only reach backend after the two sides authenticate each other via SPIRE-issued identities, the connection itself is encrypted and mutually verified, not just allowed by label match. You can confirm the handshake is happening by watching Hubble:
hubble observe --pod backend --verdict FORWARDED -o json | grep -i auth
or you can see it in hubble UI
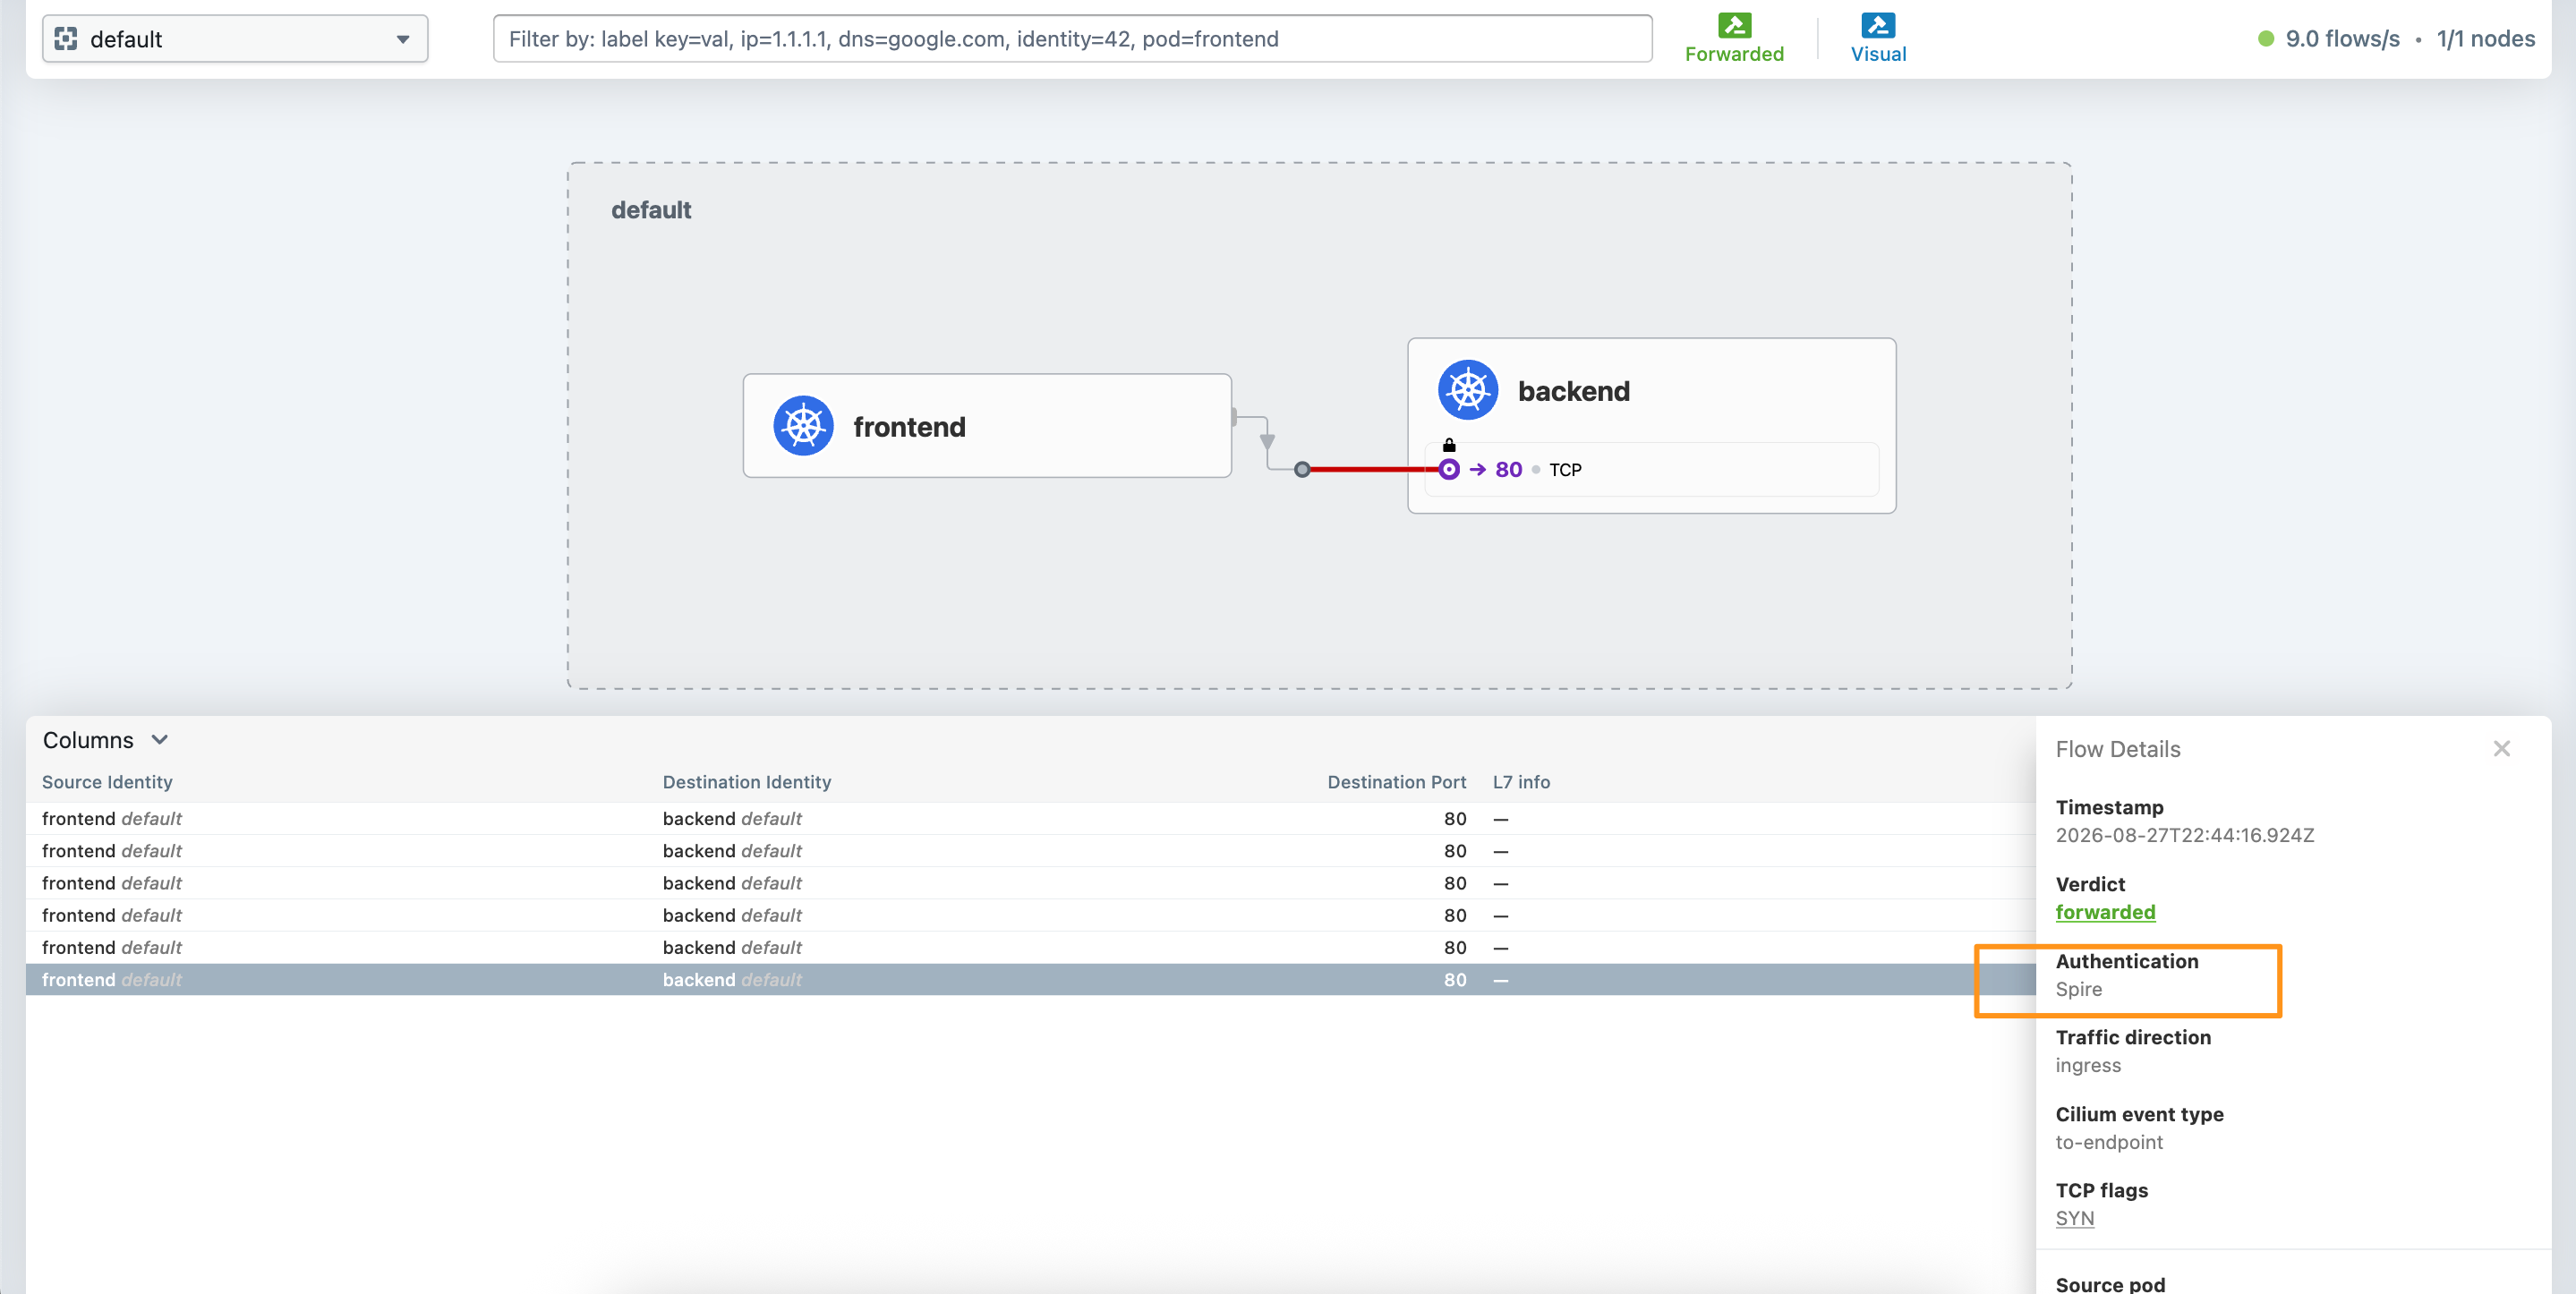
If mutual auth is failing, flows will show up as dropped with an authentication-related reason instead of forwarded.
A slightly more realistic example, chaining three tiers together:
apiVersion: cilium.io/v2
kind: CiliumNetworkPolicy
metadata:
  name: require-mtls-backend
spec:
  endpointSelector:
    matchLabels:
      app: backend
  ingress:
  - fromEndpoints:
    - matchLabels:
        app: frontend
    authentication:
      mode: "required"
  egress:
  - toEndpoints:
    - matchLabels:
        app: database
    authentication:
      mode: "required"
This restricts the backend service to only accept traffic from frontend and only initiate traffic to database. Everything else is denied by default once a policy selects an endpoint.
Part 6: Where to Go From Here
This covers the mesh fundamentals: install with mesh features on, verify the datapath is doing what you think it’s doing, observe traffic with Hubble, enforce mTLS, and write network policies. From here, worth exploring on your own:
- L7 traffic management - HTTP method/path-based rules, and richer routing behavior via the shared Envoy proxy
- Cluster mesh - extending the mesh across multiple Kubernetes clusters
- Gateway API support - Cilium can act as an ingress/gateway for the mesh, not just internal east-west traffic
- Metrics and distributed tracing - export Cilium and Hubble metrics to Prometheus, and connect network observability with OpenTelemetry traces
The official Cilium documentation is a good next stop, it’s thorough and covers each of these in depth.